We take on yet another one of the most powerful units in the game in Ihalaban’s best.
In our last post in this series, I all but proclaimed the Monarch Coatl to be the best overall unit in the game in discussing how to slow it down. There is, however, a small part of me that thinks that the Grand Bakunawa of Ihalaban is the actual best overall unit in Factions: Battlegrounds. (Of course this is all just my opinion and completely subjective) Let me make the case!
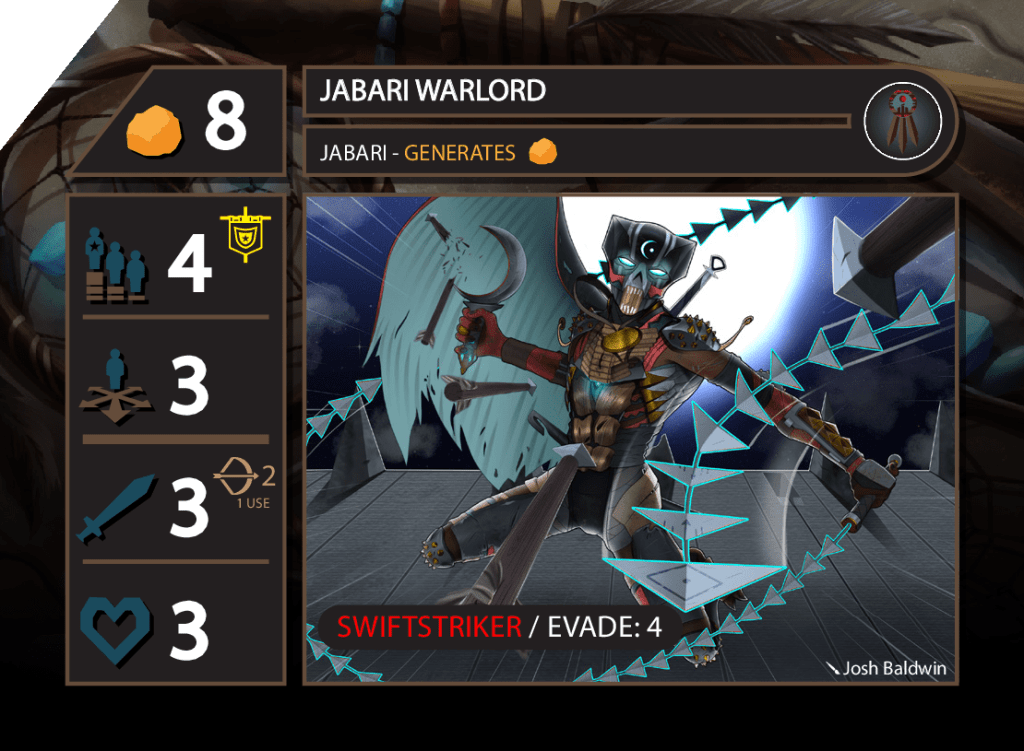
Once a unit reaches double digits as far as it’s gold cost/point value, the risk (in my opinion) begins to outweigh the reward. 10 points is a third of what your opponent needs to win, and is a lot of gold to invest in one unit. For me, when bringing in 3 of the 4 units cost 10+ gold, (Kraken Overlord, Regal Minokawa, or Royal Titan) the situation has to be evaluated and the risk of giving my opponents so MAJOR points mitigated. The 4th unit though, the Grand Bakunawa, is a no brainer though. It’s hitting the board for me!
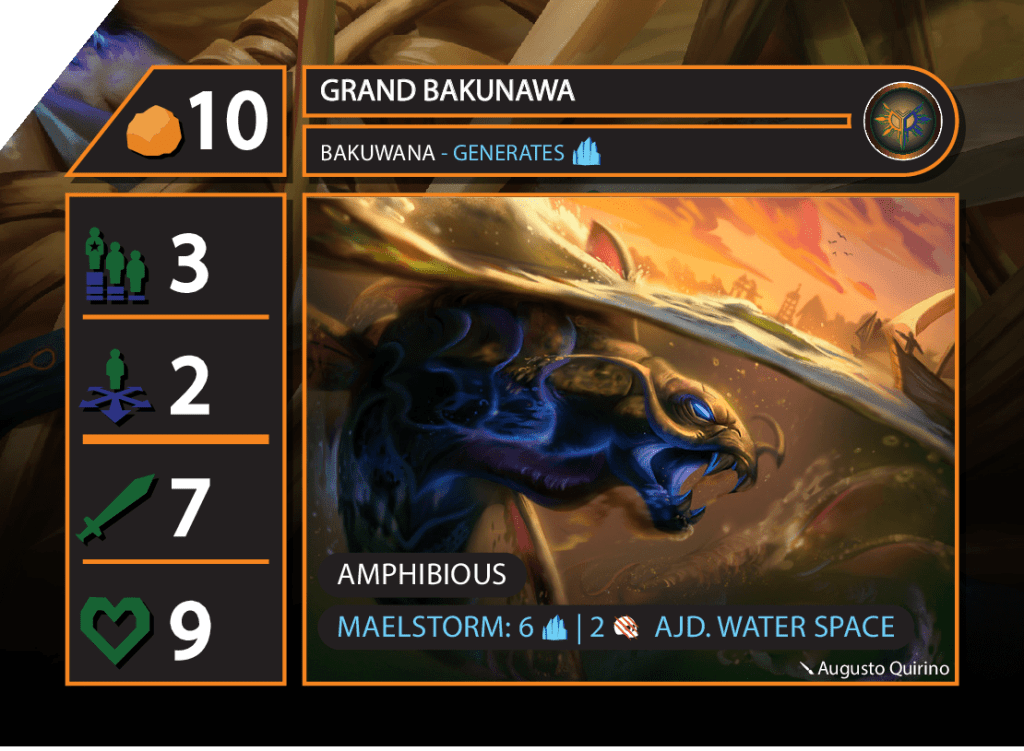
From a strictly statistical standpoint, the Bakunawa’s prowess (attack + health) of 16 is tied for 4th highest in the game. Of those units, the GB is the only unit that has an above average rank, and the only unit that has a spell. It also has the best mobility out of that group. While the raw attribute stats are enough to make it great, so much of winning battles in Factions: Battlegrounds is determined by what your units enable you to do outside of those attribute stats. For the GB, that is where it separates itself from 99% of the other units in the game.
Let’s start with that Rank. 3 Rank gives it a significant activation opportunity and that is important to watch out for. It will not often need to be commanded to be able to activate and be effective early in rounds, and will also likely be activating before the powerful melee units of most factions. That’s really worth noting because of it’s spell. Maelstrom is one of the sneaky-best spells in the game. Maelstrom does 2 damage to all units adjacent to an unoccupied water space. Any water space. On the whole board. At a cost of 6 mana, it’s not all that expensive, and with the beefy health of 9, the GB can simply relax in a corner and conjure storm after storm, waylaying unsuspecting targets. This is EXTRA devastating in multi-player battles! Water spaces themselves are relatively easy to avoid, but avoiding being ADJACENT to a water space is a much more difficult task. Lastly, but not to be overshadowed, is the Grand Bakunawa’s Amphibious ability. This allows it to ignore those water spaces as it navigates the board to destroy enemies. With an above average amount of water spaces, the GB usually can outmaneuver and track down units on edges. The Bakunawa is the rare unit that has 2 completely distinct, yet equally effective and potentially tide-turning ways to win battles, and can score points from literally anywhere. This becomes even more apparent in multi-player games! It makes a very compelling case for the #1 overall unit in the game.
So… how to stop it?
One important first step in determining how to survive this powerhouse is identifying how it entered the battleground. If it was recruited “outright” with 10 gold, then be prepared for it to sit back and utilize that mana, provided the Ihalaban player has a solid supply. Try to keep your units away from water spaces as much as possible.
Ihalaban, (like Primus) has the Runestone ability in it’s aresnal. The GB can be brought out with the Runestone through the Ihalaban Salamangkero, but that would make using Maelstrom consistently a bit more challenging. This is because it takes ALL of Ihalaban’s starting mana to summon. Ihalaban has a lot of powerful, useful spells beyond the Bakunawa, so typically when this method is used, be prepared to defend against the GB in the trenches and via melee attacks. Here are some methods by faction:
Amphibious is what really gives several units in Ihalaban the freedom to move relatively unrestricted around the board. Ignoring water space penalties can really be a huge advantage. Doom Sand is one of 2 factions (the other being Kragg) that can slow down this advantage through their tiles. As Afraid points out here, having multiple “all-land” can make setting your tiles straightforward and easy. Against Ihalaban, limiting those water spaces is imperative.

Place both “all-land” tiles against Ihalaban to lessen the number of water spaces.
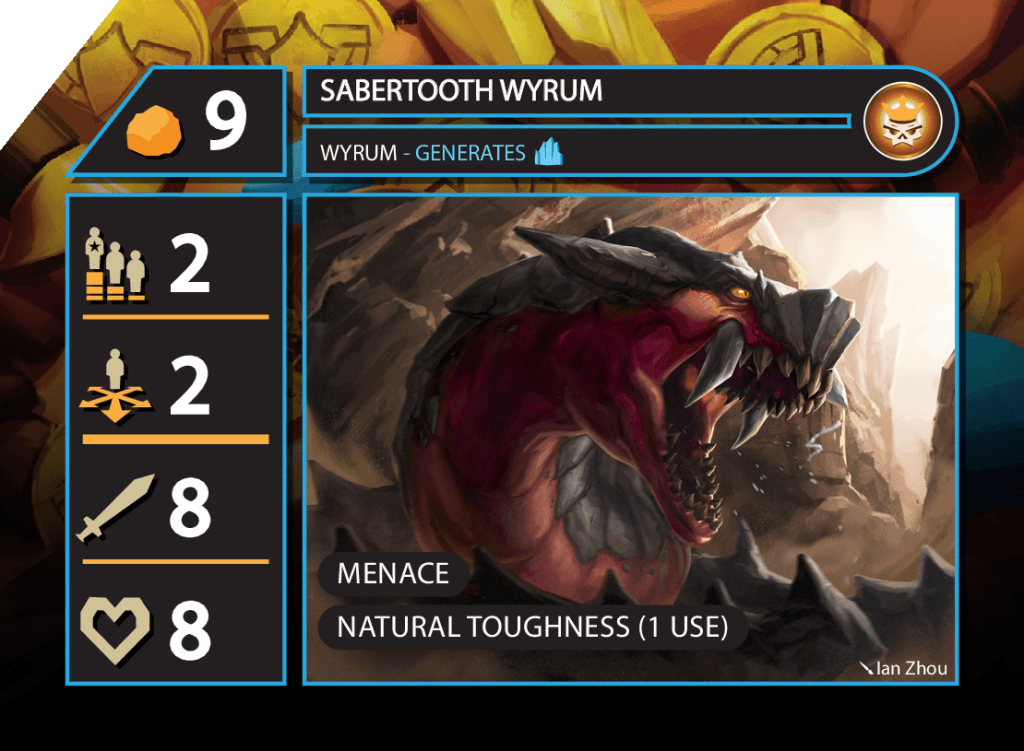
Having slightly balanced out the movement advantages of the Grand Bakunawna while giving yourself a couple of extra desert spaces to operate on, pressing the attack with the Sabertooth Wyrum is a solid idea. While not the overall force the GB is, the Wyrum can match it pound for pound in melee capability. It’s 8 health (and Natural Toughness) means it will be able to survive a Bakunawna attack when at full health and it’s Menace ability means it can cross the board confidently against smaller units without taking small cheapshots along the way. Even if it does not engage the GB directly, it’s massive presence and toughness allows you to play a little “cat and mouse”, sometimes diverting the focus of the Ihalaban player and goading them into being maybe a bit too cautious. Of course, if the Wyrum makes a beeline for the GB, it can force the Bakunawa out of it’s secure location, making it easier to damage. Either way, The Sabertooth Wyrum creates a problem that has to be addressed.
When fighting elite units with high health like the GB (or others) it is important to always have a combo in the back of your head that you can save up for or implement during a reinforcement phase, preferably a non-melee combo at that to give it more flexibility and reach. Even better if it does not include spells, as mana can be scarce. 9 health is a LOT and not a lot of factions can reach 9 damage through range and abilities. Doom Sand, however, is a different story. It should be noted, that when I say “combo” in Factions-speak, I don’t mean back-to-back activations (although that would be ideal!!) but rather I mean throughout the course of the entire battle… With that in mind, the Firesky Wyvern is a fast, aerial unit that more often than not can reach the GB at some point during the course of a battle. Let loose that Scorchblast and get a solid 5 damage on the GB. The other part of the combo is the Anubite Battlemaster’s 4 damage ranged attack, which is a LOT of damage for a ranged attack (even if it is only 1 use).


Firesky Wyvern’s Scorchblast and Anubite Battlemaster’s ranged attack total 9 damage.
Knowing that you have 9 damage reserved for the Bakunawa is a great way to enter the game. Just make sure that you stay the course and not use either the Scorchblast or the ranged attack in a panic on a different unit early on in the game!
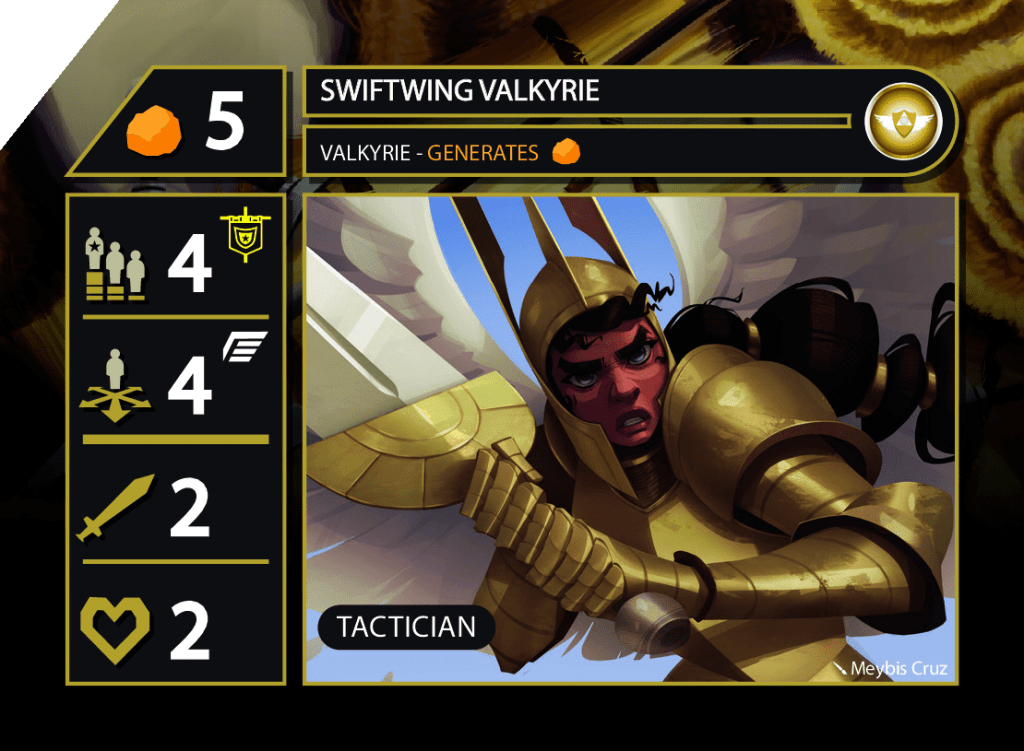
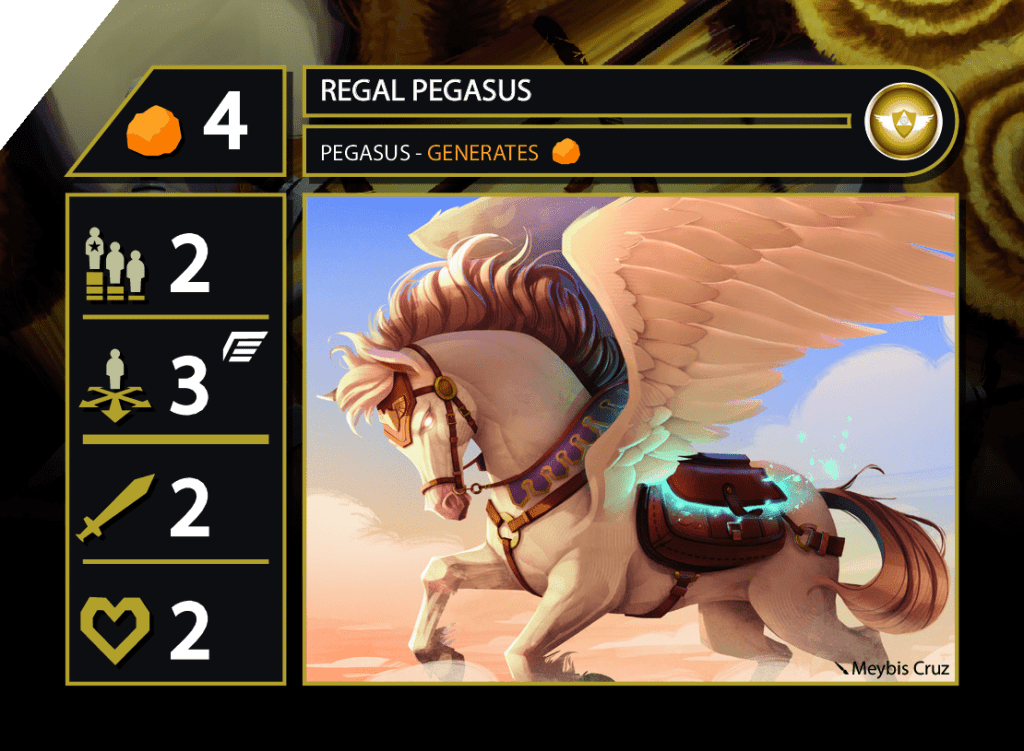
Zyan’s best strategy to slowing down the GB is by taking away it’s powerful, sneaky Maelstrom spell. Maelstrom hits only adjacent units to water spaces. One way to guarantee that you are never going to be adjacent to a water space is to be Aerial. When it comes to flying units, Zyan tops the list with 4 total. Out of the 4 flyers, 3 of them are Captains with ranks of 3 (or higher in the Swiftwing Valkyrie’s case!!) and ALL Of them have a movement of 3 (or higher in the Swiftwing Valkyrie’s case!!)
This takes away the Bakunawa’s Maelstrom, solid rank, and terrain advantage (Amphibious). Unfortunately, it still has one BIG advantage, and that is it’s overwhelming melee attributes. Be prepared, if using the “fast flock” strategy to lose some of the flock for sure. With wise use of Command and acting quickly, you can lessen your casualties. I like to call this the “Fast Flock” sending as many of them as you can (while remaining in the air!) at the GB as quickly as possible. Ihalaban will score some points, but the GB can be eliminated somewhat earlier in the game with this method as opposed to having it stick around and gradually dominate.

Zyan has a variety of fast, high rank flying units.
Another strategy with the Zyan flyers is remembering don’t NEED to eliminate the unit, just wound it a bit. The Swiftwing Valkyrie and the Regal Pegasus make for great choices for getting some damage done due to their affordability and speed. If a couple attacks end up landing, Zyan’s Unicorn Warhulk is a “break glass in case of emergency” type of finisher. It’s 3 movement is great as is it’s high damage, but the Bullrush ability allows it to get exactly where you need it, regardless of what is block it’s path.

Unicorn Warhulk has the speed and power to finish off wounded units.
One caveat to all of this with Zyan, is that you HAVE to move aggressively.. Waiting in the wings (or with the wings!) against Grand Bakunawa or Ihalaban in general will end in Zyan getting pushed around by powerful spells and superior attack and health attribute Ihalaban units.. Zyan is a fast, aggressive faction that thrives off of using commands, movement and high activations to infiltrate tiles in the enemy zone and score points before the enemy gets too comfortable!
Grand Bakunawa is tough on every faction, but it’s extra tough on Parada. This is because Parada’s ranged units all have health of 2 or less…. and if Ihalaban has the board set up well, they will have to be adjacent to a water space at some point in order to even get within range. With the Bakunawa’s health, the mighty Elf Sharpshooter still needs *3* activations to eliminate it…. simply not going to happen before somehow that elf’s 1 health is exposed. With Parada’s top offensive collective weapon, range, greatly mitigated, Parada players have to think outside the box a bit…
Identifying the most dangerous spaces adjacent to water spaces and occupying them with cheap units will help Parada lessen the options for a strong Maelstrom, while establishing a couple of units that can serve as front line damage absorbers. It is not at all a glamourous job, but cheap units like Grove Umuthi and Eloko Recruit leading the way, taking damage, and forcing Ihalaban to delve into their mana supply to clear those spaces can set the table for more skilled offensive units.

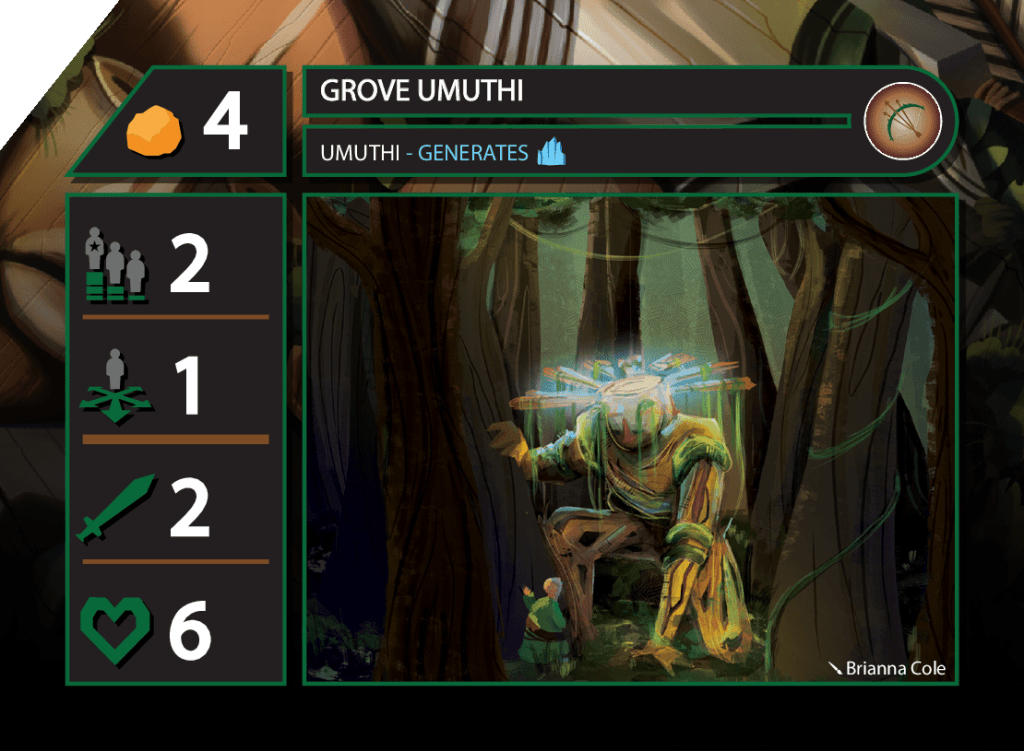
While not great units, Eloko Recruit and Grove Umuthi are cheap and can absorb spells and damage.
Grove Umuthi in particular is a nice choice because it will take 3 Maelstrom spells to eliminate it, making it a sturdy presence.
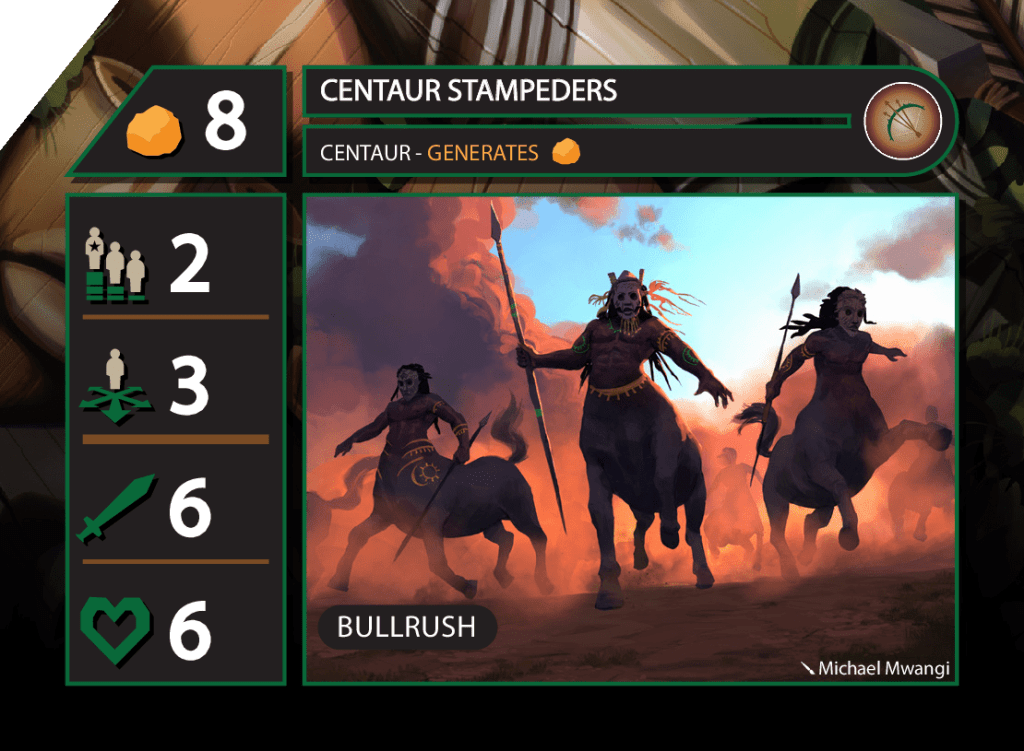
As with other high health enemies, wounding throughout the battle is the way to go. With Parada, getting to 3 damage on the GB is the “magic” number… Once this is achieved it’s time to look exclusively for the opportunity to send the Centaur Stampeders on a one-way path to the finishing 6 damage. Like with the Unicorn Warhulk, Bullrush is extremely important because you do not need to worry about your units interfering with the Stampeders path.
Overall, Parada has to seek out opportunities since the GB is such a big threat to derailing their entire attack strategy. Any chance to do some damage with a low cost unit that you don’t mid using should be taken..
If we’re looking at numbers alone, Grand Bakunawa seems near-impossible for Moonshadow to take on. While it certainly isn’t a cake walk, I know from experience that it is totally possible. However, since Grand Bakunawa is a unit with two very different but incredibly deadly playstyles (frontline attacker and backline spellcaster), you need to be extremely flexible and use your resources extremely wisely.

Let’s start with dealing with the Grand Bakunawa as a backline caster first, as it’s a little less complicated. It essentially boils down to “play defensive until the Ihalaban player runs out of either mana or patience”. Moonshadow has access to some really strong units with Evade, which can give them a chance to dodge Maelstrom if they aren’t able to avoid affected spaces, as well as some flying units which aren’t affected at all while aerial. However, dodging a threat isn’t the same thing as dealing with it, so don’t think of these units as ways to take out the Grand Bakunawa, but instead as units that you can feel relatively comfortable developing onto the board if you need to deal with other threats. When the Bakunawa comes out, try to play defensively to build up enough resources to take it down. The final two units I’ve included above are there simply because they’re cheap and efficient ways to generate gold, which will be extremely necessary once the Grand Bakunawa starts taking a more aggressive role on the battlefield, because unfortunately every single unit option in the real anti-Bakunawa strategy generates mana.


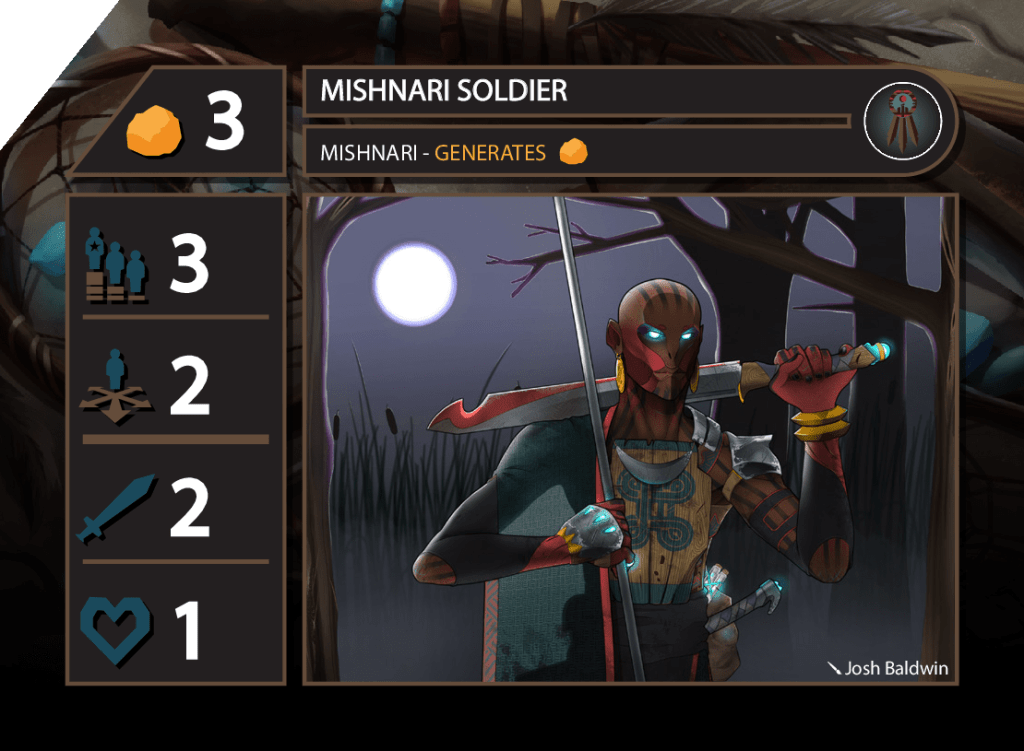
The Moonshadow strategy I’ve come to rely on against Grand Bakunawa is centered around the hantu-hantu (the correct plural form of “hantu”), and is more focused around disarming the Bakunawa’s abilities as a frontline threat, which is in general the playstyle I prepare for most. Why do I care more about addressing it as a frontline threat than a backline threat? Simple: mana runs out, melee attacks don’t. Moonshadow has a lot of units that are, for one reason or another, fairly resilient against Maelstrom, but the issue with outlasting Maelstrom is that, when the smoke (or should I say storm clouds) have cleared, you’re now staring down a behemoth with 7 attack and 9 health. The hantu-hantu help alleviate this problem with their Poison Orb spell, which lowers the attack power of its target by two. Of course, you’ll need to land whichever hantu is casting this, allowing the Bakunawa to hypothetically retaliate, but since the hantu-hantu are only worth 3 and 4 points, oftentimes that’s the least efficient use of the Bakunawa’s activation. Ideally you’re able to fully drain its the Grand Bakunawa’s attack to 0 using the low-risk hantu-hantu strategy alone, but that won’t always happen. Still, in most games you’ll be able to use each of the hantu-hantu one time, and once you do, you’ve already brought the Grand Bakunawa down from 7 attack to only 3. Unfortunately, 3 damage is still enough to take out all but two of Moonshadow’s units, the two winjaru. Luckily, they also happen to be the perfect next steps in the strategy to take out GB.
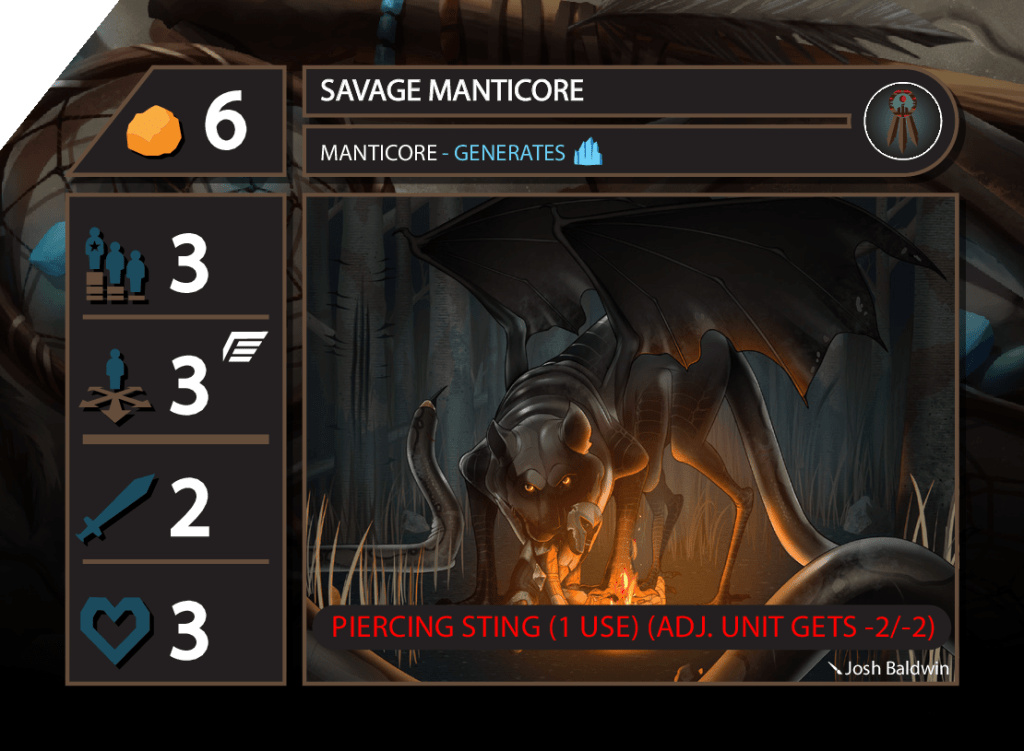

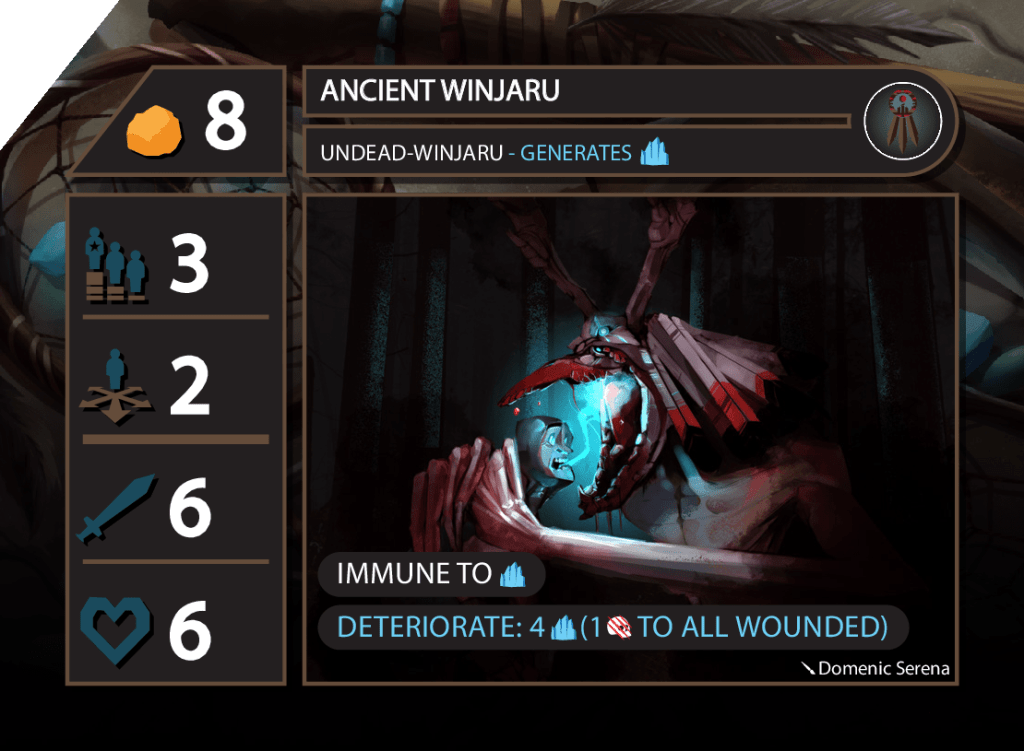
Once you’ve cast Poison Orb on the GB twice, you have three solid options for follow-up units, shown above. My personal favorite is to add insult to injury and bring down the Savage Manticore. the Manticore can chase down the Bakunawa while in the air, then land to use Piercing Sting, which brings the once-great serpent down to a measly one point of attack! If you manage this, you can start being way more cavalier with which units you bring into the fray, since almost all of them will be able to take a hit from the GB. If that’s not your style, either of the Winjaru can do very nicely to begin taking back the board and threatening to take out the GB and and score its huge 10-point bounty. As is standard, the Ancient Winjaru is a bit more reliable than the Winjaru Villagestalker, but it comes at a steeper price, so it’s up to you to make that call.
Let’s once again start with how to deal with Bakunawa’s spell first. Zermano’s approach is a lot less strictly-defensive than Moonshadow’s, since you’re still going to have effective ways to affect the board while only spending 5 or 6 gold.


Zermano is very well-equipped to deal with Grand Bakunawa’s Maelstrom ability, and it kind of needs to be, since it’s one of the factions with the most water spaces. Maelstrom only hits tiles that are adjacent to unoccupied water spaces, so a great way to immediately give your land-bound units safe passage is to occupy those water spaces with units with Aquatic or Plunge!

Quicksilver Golem is, in my opinion, an all-star for these purposes. It’s actually a really good unit against Ihalaban in general. Ihalaban only has 3 units that can kill Quicksilver Golem in one hit, the cheapest of which is 7 gold. That means that if they want to take it out, they’ll have to spend two whole activations, and those activations will have to be melee attacks, which restricts their movement, letting you catch up and take advantage of the Ihalaban player’s loss in momentum. Again, however, avoidance is not the path to victory, it is merely the scenic route to defeat. The units above can take on other Ihalaban units while minimizing damage from Grand Bakunawa, but they can’t themselves take out the Bakunawa. So, which units can?
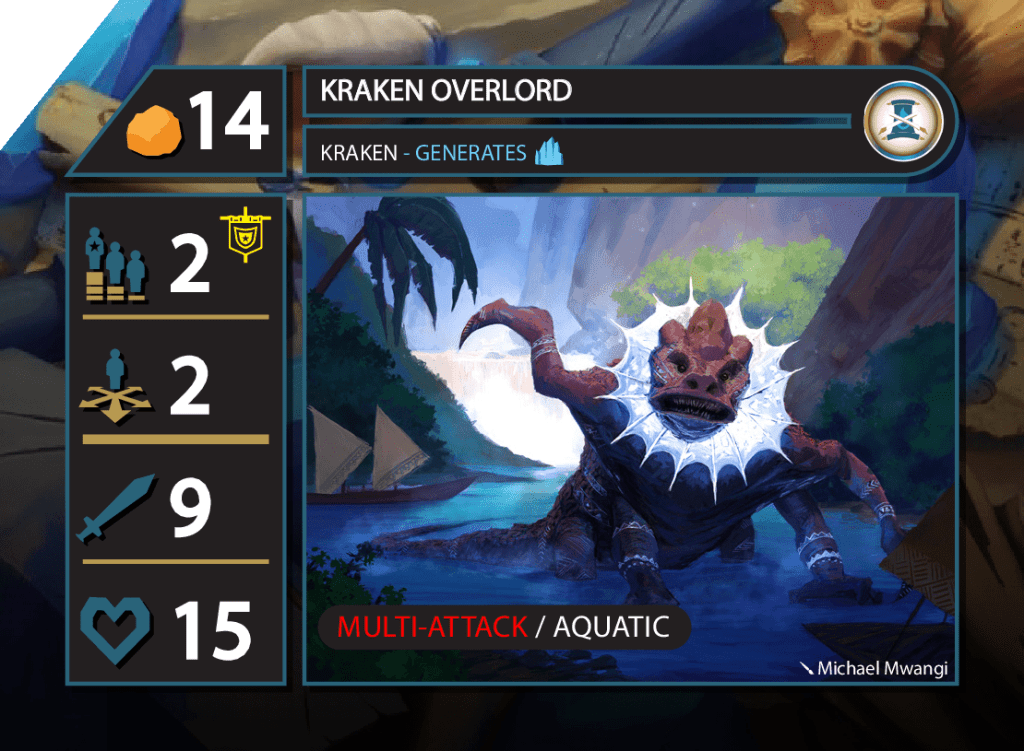
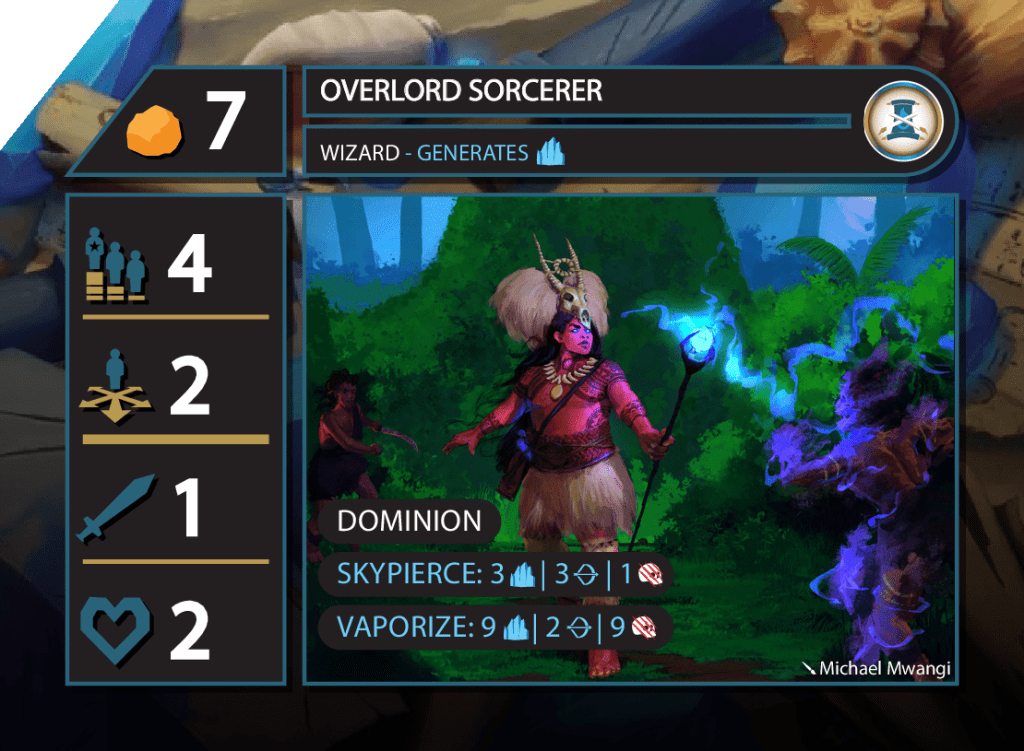
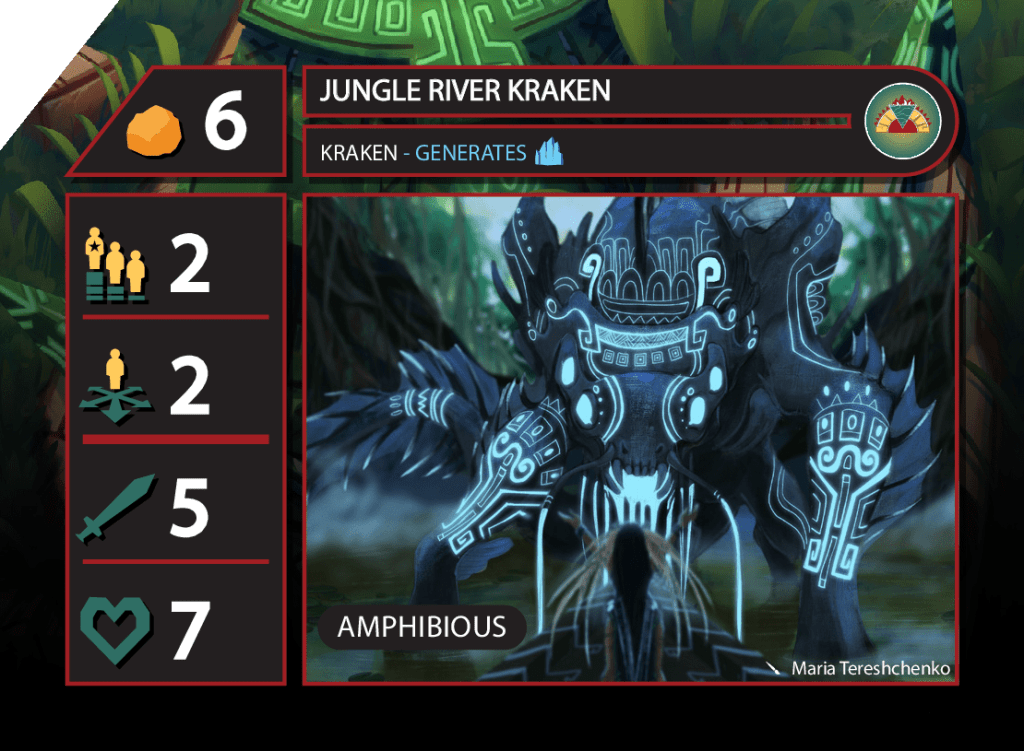
If you have enough gold for Kraken Overlord, you’re probably already in a good spot, so it’s a little bit of a “win-more” unit. However, since it’s an Aquatic unit and can’t effectively chase the Bakunawa while it’s on land, you’re much better off recruiting Overlord Sorcerer and hitting the Bakunawa with Vaporize, once they’ve lost their patience and overextended onto your side of the battlefield. 9 mana for 10 victory points is a deal I’d take every time.
The strategies for Primus are more of the same, and this post is already insanely long, so I’ll be brief.

Here are two good units to occupy water spaces and nullify Maelstrom. They can still get taken out by GB’s melee attack, but they’ve got powerful enough stats to take on most other Ihalaban units.
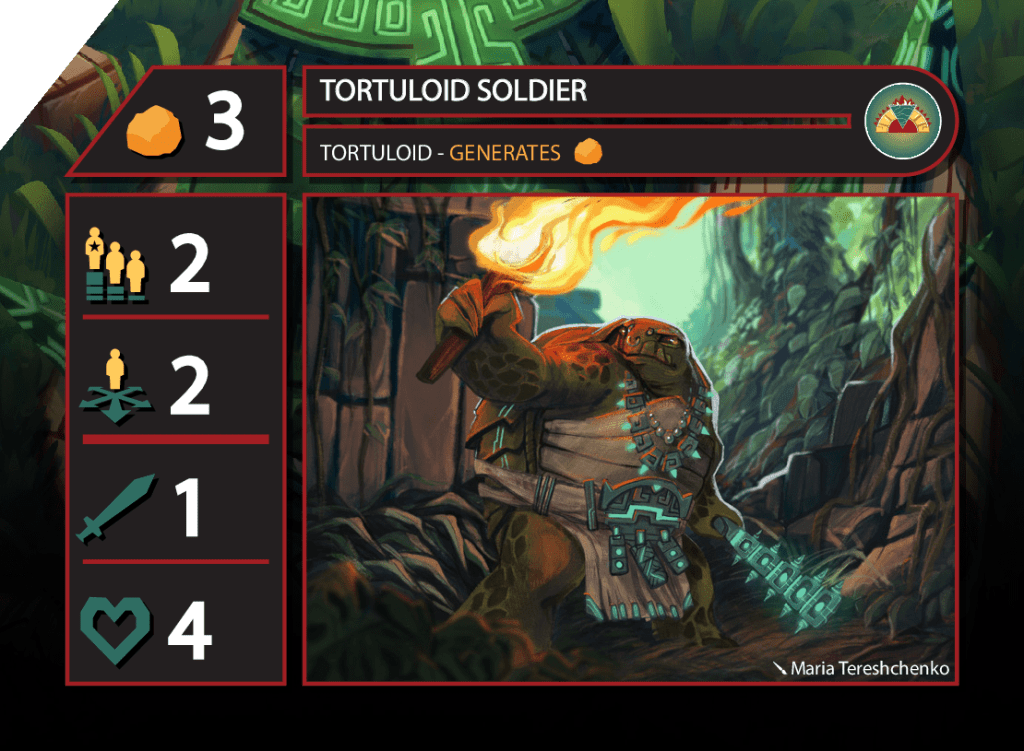

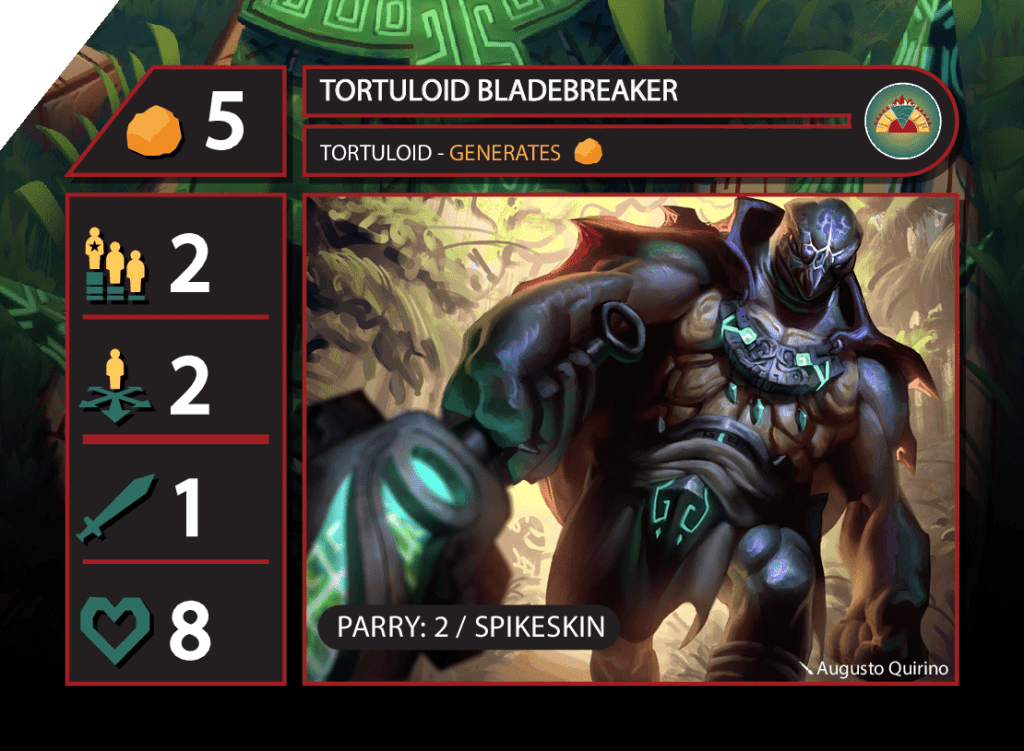
Primus has some great cheap, gold-generating units that you can use freely on the board without having to worry about them being taken out by a single Maelstrom. Tortuloid Bladebreaker can actually take a direct melee hit from GB itself, which can’t be said for very many units.


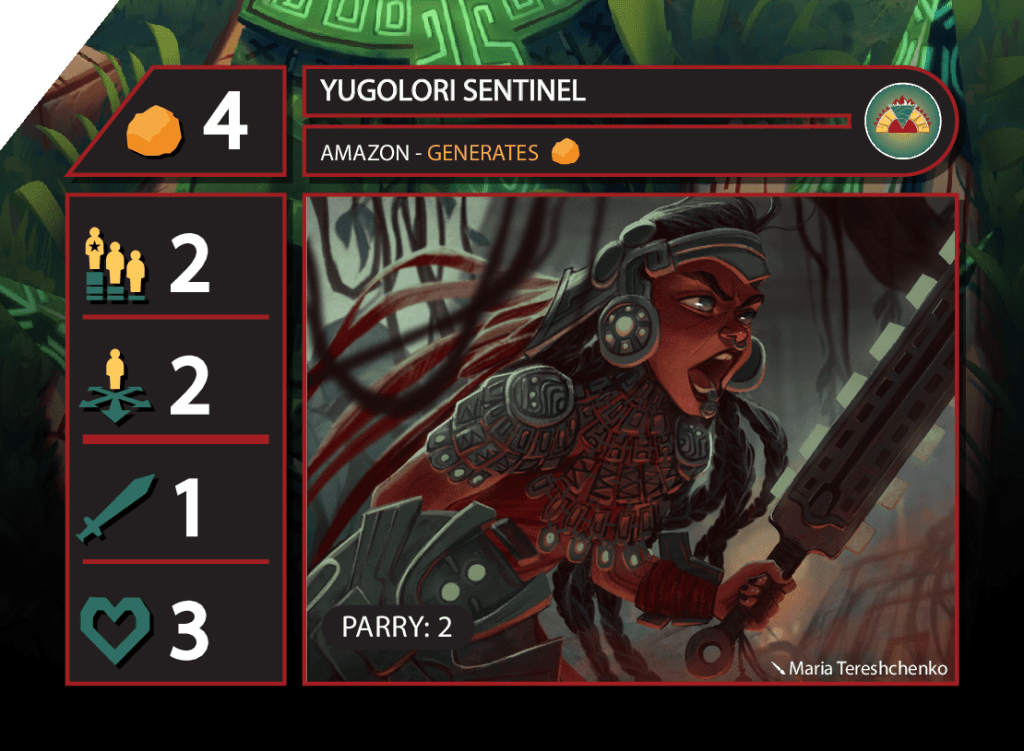
As for more proactive units, Amazon Champion has a 67% chance of dodging melee attacks, but if it ever does end up getting hit by the GB, that’s lights out and you’re down 8 victory points. Still, its got good stats, generates gold, and gives you an immediate 4 gold worth of value with its War Horn ability, so it’s a good unit to bring out if the Ihalaban player is playing defensively. Mystic Witch can also give you a lot of gold value with Runestone, and it doubles as a ranged poker, which is also very important in this matchup. Amazon Javelineer, Iguannax Archers, and both witches can gradually chip away at GB’s health, and let you follow up with a flying finisher.


Either one of these work fine, it really just depends on how much mana you have available. It’s also important to note that Greater Wyvern activates after Grand Bakunawa, but Monarch Coatl activates before, so depending on where the Grand Bakunawa is on the battlefield, that might mean that the Coatl is able to get to it a turn faster.
That concludes our first HOW TO STOP series!! Having some trouble slowing anything else down? Let us know in the comments and we will put together a post helping you out!
